NOTE: I originally published this post in 2014, but it has been so popular that I’m sharing it again! It’s now three years later and this compost bin is holding up FABULOUSLY! The only thing I have had to do is replace the chicken wire with hardware cloth; our giant pitbull mix keeps nosing the bin trying to get at the kitchen scraps we compost, and the chicken wire wasn’t strong enough to keep her out. But the hardware cloth is working great!
One of my favorite things about owning a house is having a back yard with room to garden! Getting the garden planted was the first thing I did as soon as the snow melted; there are still boxes left to unpack from the move, but our garden is planted and thriving!
The second thing I did was build a DIY compost bin! I love the idea of reusing food waste; it keeps it out of the landfill, and my plants will absolutely love the rich soil! I know there are tons of pre-made compost bins that you can buy from a hardware store, but I had specific ideas about how I wanted mine to work, so I built my own!

Save
I had a lot of fun designing this DIY compost bin! My mom is also an avid gardener and I spent a lot of time talking to her, my dad (the woodworker), and my aunt and uncle who just finished building their own compost bin about what makes a good compost bin. We decided the following things were important:
- Easy to add things to the top of the pile, preferably being able to open the lid with just one hand since you’ll be holding the compost bucket from your kitchen with the other
- Lid has to latch to keep the critters out (my parents have crazy stories of their years long battle with the raccoons and rats in their area that kept getting into the bin!)
- Easy access to the bottom of the compost pile to get out the soil that has finished composting (this piece also has to latch because of critters)
- Bottom of the bin that sits on the ground also has to be critter proof, so nobody tunnels up from the bottom
- Open and airy enough to allow for good airflow, and to let bugs and worms in to speed the decomposition
- Sturdy enough to hold up to the crazy Chicago weather
So I finally came up with a design that met all the criteria above!
How To Build A DIY Compost Bin
- 4-6 hours (time spent doing stuff)
- 0 hours, unless you need a break! (time spent waiting around)
- 4-6 hours (total project time)
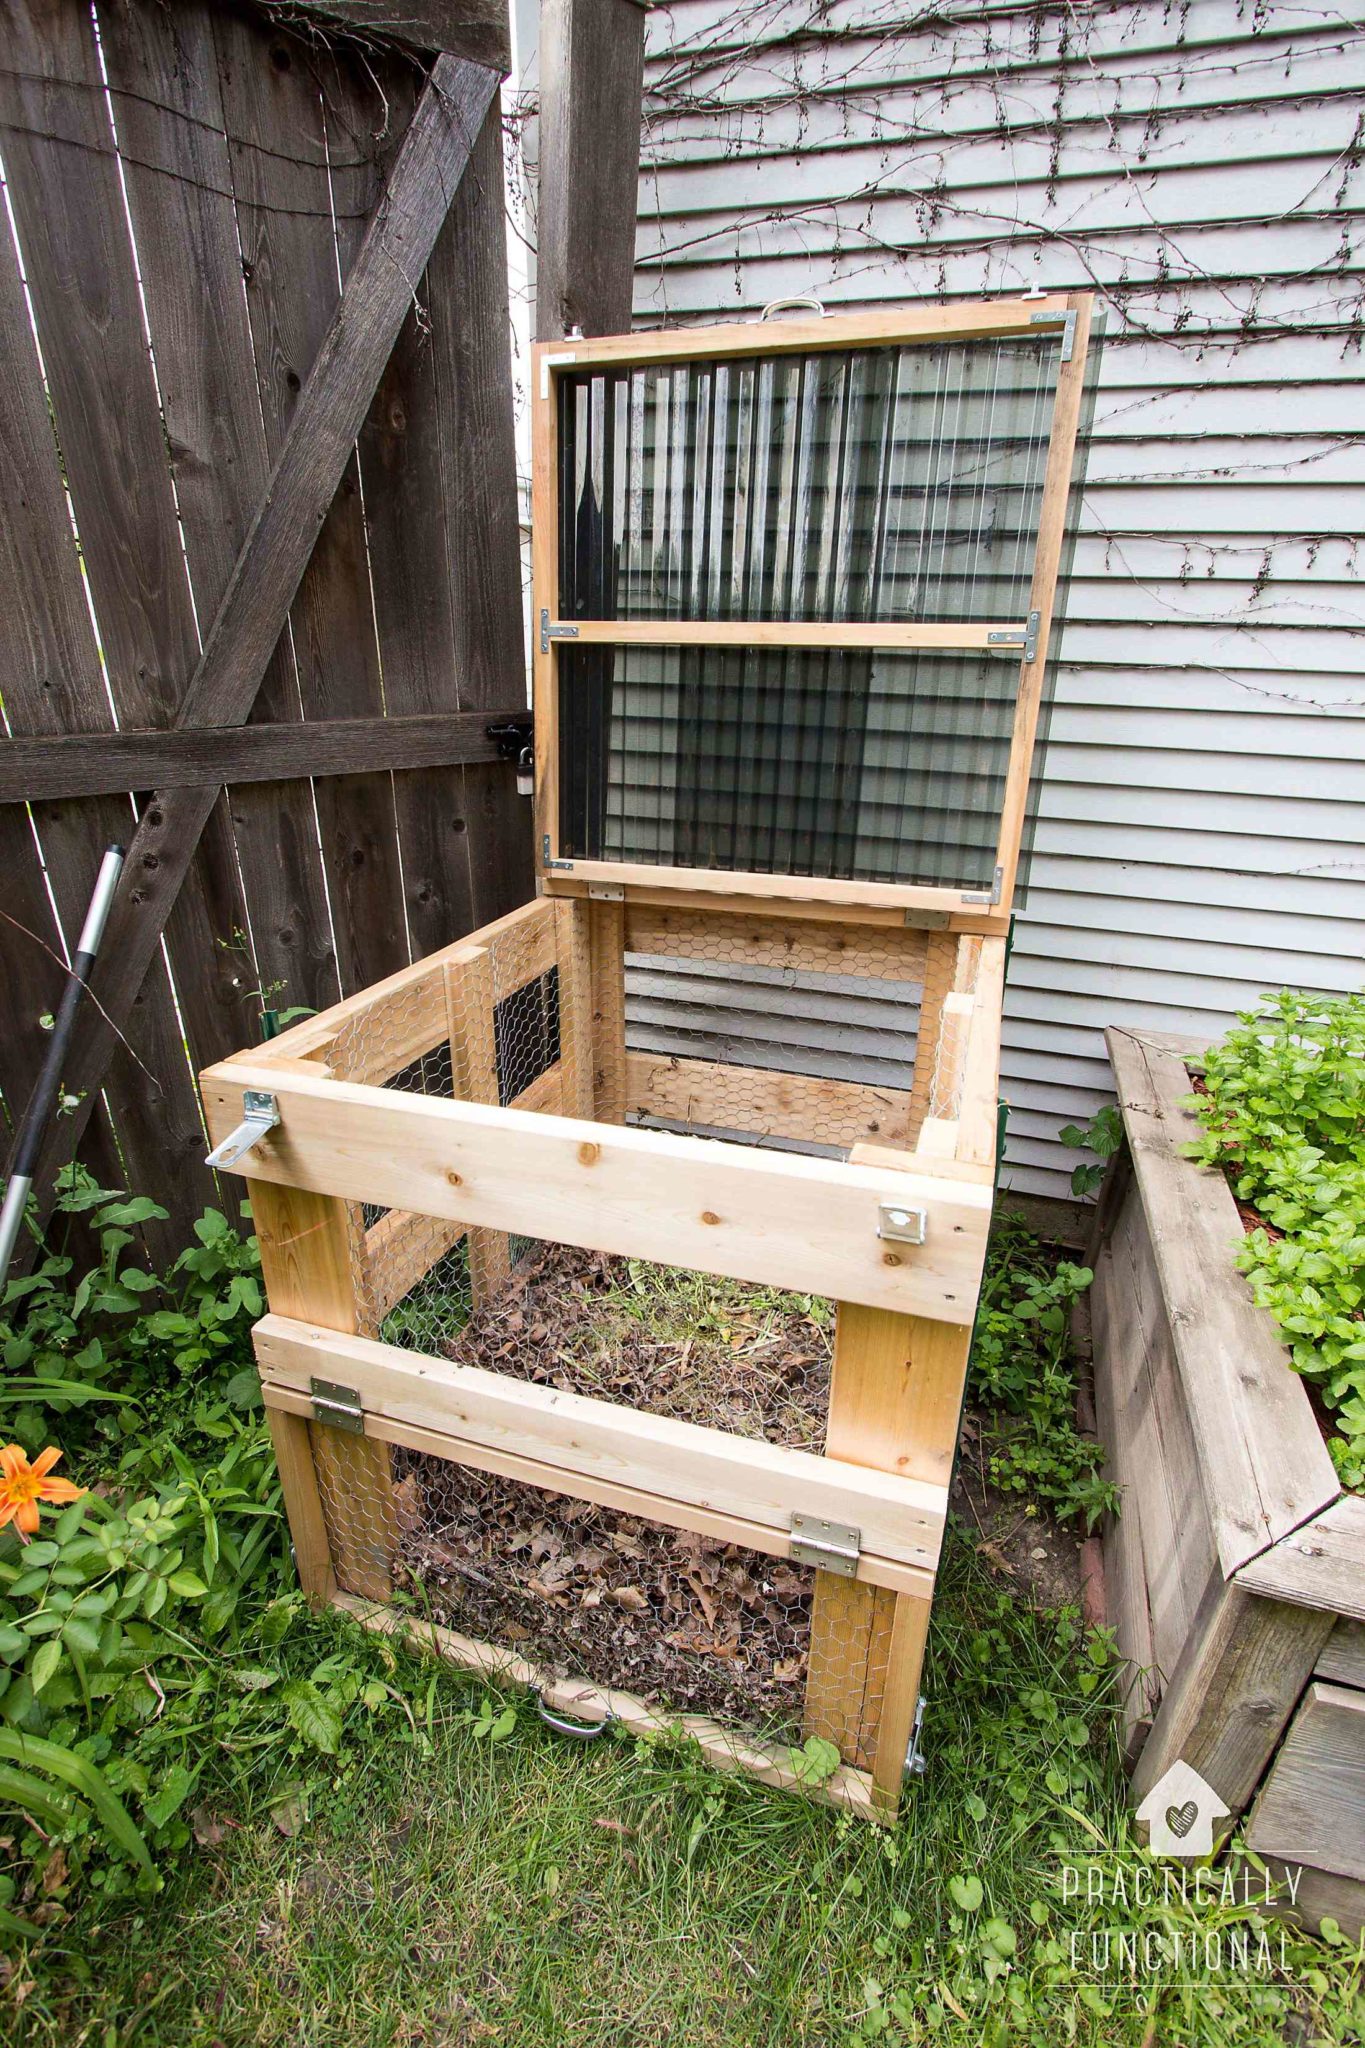
This is the design I came up with in SketchUp. The entire thing is covered in chicken wire or hardware cloth to allow airflow (even the bottom so that critters can’t tunnel into the bin from below). The lid has two latches and is covered with corrugated polycarbonate to protect it from the weather. (Note: if you don’t mind rain and snow and ice getting into your compost pile you can just cover the lid with chicken wire instead.)
The front panel is split in two and the bottom portion lifts up so that you can scoop out the compost from the bottom of the pile when you’re ready to garden. And the bottom panel also latches to keep critters out.

The materials list, lumber list, and instructions for building this compost bin are below. At the bottom of the post there is a “Print” button that will format the instructions for printing. You can also download the scale drawing I created for this compost bin by clicking here. I used SketchUp to create this drawing, so you’ll need the SketchUp program in order to open the file. Luckily, SketchUp is free and you can download it here!
This drawing file is copyright by Practically Functional LLC and is for personal use only. Please do not redistribute this file or use it for any commercial purposes. (But feel free to link to this post so others can come download the file for themselves!)
Lumber/Cut List:
We used untreated cedar for our compost bin; it’s slightly more expensive than treated lumber, but since I plan on using this compost in our edible garden, I want to make sure the compost doesn’t leach any chemicals out of the lumber as it sits in the bin.
You can make the following cuts yourself, or if you buy your lumber from a major hardware store, they’ll usually make the cuts for you if you ask! We went to Home Depot, picked out a few boards, and a super nice employee made all of the cuts for us while we continued shopping for the other supplies we needed. Just take this cut list into the store with you and they can do the rest!
- 2×6 boards (two 12′ boards and three 10′ boards), cut into the following pieces:
- 15 – 2×6 at 3′
- 2 – 2×6 at 3′ 3″
- 2×4 boards (one 12′ board and one 10′ board), cut into the following pieces:
- 7 – 2×4 at 3′
- 2×2 boards (two 12′ boards), cut into the following pieces:
- 2 – 2×2 at 3′
- 2 – 2×2 at 1′ 3-3/4″
- 2 – 2×2 at 3′ 1/2″
- 3 – 2×2 at 2′ 9″
Materials:
I’ve created a list on Home Depot’s website of everything you need to make this compost bin. I entered the correct quantities for this project, so just click “Add To Cart” to add each item to your cart and you’ll have all the hardware you need! Click here to see the DIY compost bin hardware list.
- 15′ of 3′ tall hardware cloth (I originally used chicken wire, but after a few years our giant pitbull mix wore it out in places by nosing into the bin and trying to eat kitchen scraps!)
- box of #8 2-1/2″ deck screws (I love square drive screws because they’re so easy to drive, but if you don’t have a square drill bit, you can get these same deck screws with a Phillips head drive)
- 3′ x 3′ corrugated polycarbonate panel (I used a large panel, cut it down to size, and pieced it together to get 3′ by 3′)
- clear silicone sealant (to seal the lid if you have to piece it together)
- 2 gate handles
- 4 3-1/2″ door hinges
- 4 3-1/2″ latch post safety hasps
Tools:
I’ve also created a list of all the tools I used, in case you need to pick up a few for this project. Click here to see the DIY compost bin tools list.
- pencil

(Note: I used the handheld staple gun pictured for this project, but it kept jamming and the whole chicken wire part took about as long as the entire rest of the build. When I replaced the chicken wire with hardware cloth I used my AirStrike cordless stapler and I got the entire bin covered in under 15 minutes. The handheld staplers will work, but if you can get your hands on an AirStrike stapler, those things ROCK!)
Sides of the bin
Start by building the sides of the bin. You will need the following for each side:
- 5 – 2×6 at 3′
- 3 – 2×4 at 3′
- 1 – 2×6 at 3′ 3″
Lay out all three 2×4 boards so that they are evenly spaced across 3′ of space. Then lay out three of the 3′ long 2×6 boards perpendicular across the tops of the 2×4 boards, evenly spaced again, so that you end up with a square grid.

Pre-drill two holes at each end of each 2×6 board. Pre-drilling your holes helps keep the wood from splitting as you drive your screws. Once your holes are drilled, square up the boards using your carpenter’s square, and then attach the 2×6 boards to the 2×4 boards using the 2-1/2″ deck screws. It’s super important that all of your boards are square before you attach them, otherwise your compost bin is going to be lopsided!

You’ll use the other three 2×6 boards to help reinforce the grid. The 3′ boards will go along each side and the 3′ 3″ board will be the bottom of each side, as shown in the photo below.

Remember that the vertical 2×4 boards are on the “inside” of the compost bin, while the horizontal 2×6 boards are the “outside”.
Stand the grid on its side so that the 2×6 boards are standing vertically, and place one 3′ 2×6 board on top of the grid, lining up the long edge of the board flush with the “outside” edges of the 2×6 boards (as shown in photo below).
Pre-drill holes into the middle of the 3′ 2×6 board. You want the screws to go into the 2×4 board, not the 2×6 boards; this will give you a stronger attachment. Drive 2-1/2″ deck screws to attach the support board to the side of the grid.

Then rotate the grid 90 degrees so that the 2×4 boards are standing vertically. Place the 3′ 3″ 2×6 board on top of the grid, lining up the long edge of the board flush with the “outside” edge of the 2×6 board so that the entire “outside” surface of the grid is flush. This 3′ 3″ board will become the “bottom” of the bin.
Pre-drill holes into the 3′ 3″ 2×6 board so that you have 2 holes lined up with each of the short ends of the vertical 2x4s. Drive 2-1/2″ deck screws to attach the support board to the bottom of the grid.
Flip the grid over so the 3′ 3″ board is on the bottom, and you have made one side of your compost bin! (The photo below is shown from the “inside” of the compost bin; the boards are all flush on the side facing the fence, but they are not flush on the “inside”, which is totally fine!)

Back of the bin
For this part, you need:
- 3 – 2×6 at 3′
Once you have two sides, rotate them 90 degrees so they are standing on their side edges; the 3′ 3″ bottom boards should be standing vertically. Then lay three 3′ 2×6 boards across the two side pieces to make the back of the bin. (See photo below; the “bottom” of the bin is facing the camera and the “top” of the bin is facing the fence)
Pre-drill two holes at each end of the 2×6 boards, then square the boards to the sides of the bin and drive 2-1/2″ deck screws to attach the “back” boards to the two sides.


Front of the bin, plus hinged door
Next we will add some support to the front of the bin, and build the hinged lower door for easy compost access. For this part, you need:
Lay out the 2×2 boards into a rectangle so that the entire length of the shorter 2×2 boards is sandwiched between the ends of the 3′ boards. The entire rectangle should be exactly 3′ long and 1′ 6-3/4″ tall (the 1′ 3-3/4″ boards plus 1-1/2″ on either end, the width of the 2×2 boards).
Pre-drill a single hole through both ends of the 3′ boards. Then square the joints and use 2-1/2″ deck screws to attach the 3′ boards to the shorter boards.
Attach a flat corner brace to the bottom of each corner. This will help support the joint since you only have one screw holding each corner together.

Flip the bin over so that it is laying on the back boards and the open front is face up. Pre-drill 2 holes into each end of the 3′ 2×6 board and place the board on the “front” of the bin, flush with the “top”. Square the board and attach it to the “front” of the bin using 2-1/2″ deck screws. (see photo below)
Set the 2×2 door frame on the bin so that three sides are lined up with the sides and bottom of the compost bin. Place the 3′ 2×4 board on the “front” of the bin, about 1/4″ above the door frame. Pre-drill two holes in either end, square the board to the bin, and attach using 2-1/2″ deck screws. (see photo below)
Attach the door frame to this 2×4 board using the two door hinges.

Attach the gate handle to the front of the door frame at the bottom.
Then attach the latch post safety hasps to either side of the door to hold it closed. I attached the “post” part of the hasp to the door frame itself, about 3″ up from the “bottom” of the bin.

Then I lined up the hinged latch part of the hasp with the post, and attached the hinged latch to the bin frame itself.

Top of the bin and hinged lid
Next you’ll build the lid and top of the bin. For this part, you need:
Rotate the bin back to upright (bottom boards on the bottom). Place the 3′ 2×6 board across the bin, at the back. Pre-drill two holes in either end of the board, square the board so it is flush with the back of the bin, and attach using 2-1/2″ deck screws. (see photo below)
Build the lid frame the same way you built the lower door frame. Lay out the two longer 2×2 boards, and put the three shorter 2×2 boards in between the longer boards, evenly spaced. Pre-drill a single hole in the longer 2×2 boards at each joint, square each joint, then attach the frame using 2-1/2″ deck screws. (see photo below)
Attach flat corner braces at each of the four outer corners of the lid, and attach the two T-plates at the joints in the middle of the lid.

Attach the lid to the 3′ 2×6 board using the two door hinges.
Attach the gate handle to the top of the lid at the very front.
Then attach the latch post safety hasps at the front of the lid to hold it closed. I attached the “post” part of the hasp to the lid itself, at the front, about 3″ in from the sides of the bin. Then, same as with the lower door, I lined up the hinged latch part of the hasp over the posts and attached the latch itself to the front of the bin.
Now you have the framework of your DIY compost bin completely built!

Adding hardware cloth
The next step is to add hardware cloth to help keep the compost in the bin and the critters out! For this part, you need:
Tip the bin backwards so it’s resting on its back boards. Using your staple gun, staple hardware cloth across the entire bottom of the bin. Be sure to put staples every 3″ or 4″ to make sure it’s held on well and no critters can burrow in between the staples.
We found the easiest way to do this was to leave the hardware cloth on the roll, and slowly unroll it as we attached it. Once the entire bottom is covered, use the wire cutters to snip the hardware cloth free of the roll, flush with the edges of the compost bin.
Then stand the bin upright and add hardware cloth to the inside (you could do it on the outside of the bin, but it isn’t as pretty and it doesn’t contain the compost as well; stuff can slip out the gaps between the boards, so it’s better to attach it on the inside). Again, the easiest way to do this is to put the whole roll inside, start in one corner, and slowly staple and unroll as you go. Make sure you attach hardware cloth to the lower door frame as well, as a separate piece so you can still open the door.
Feel free to go heavy on the staples! You don’t want to leave any spaces for rats and other critters to get in, so staple away!
Note: The photos show us using chicken wire instead of hardware cloth, but like I mentioned before, our giant pitbull mix kept nosing the bin to get at our kitchen scraps, and the chicken wire slowly started to fail after a few years. I replaced it with hardware cloth and that’s holding up great, so I suggest using hardware cloth in the first place!

Covering the lid
Once you have hardware cloth everywhere, it’s time to cover the lid! For this part, you need:
Take your 3′ x 3′ piece of corrugated polycarbonate and attach it to the top of the lid frame using the 1″ wood screws. There’s no need to pre-drill these holes; the screws are short enough that they shouldn’t split the wood, and the screws will drive right through the polycarbonate without issue.
Our piece of polycarbonate was not actually 3′ wide, so we had to layer two pieces next to each other. We overlaid two pieces so that the corrugations fit nicely together, and used DAP clear silicone sealant to hold the pieces together. Then we added our wood screws about every 3″ or so around all four edges to hold the polycarbonate in place.
We also added a few wood screws in the 2×2 in the middle of the lid frame, just for good measure!

Installing the bin
The last step is to find a place for your DIY compost bin, and “install it”! For this part, you need:
The bin itself is really beefy and strong, but we added a few fence stakes just to be extra sure that no critters could tip it over, or that the strong summer storm winds wouldn’t knock it over.
First, find a place for your bin.
You want it to be near your garden so you don’t have to carry the finished compost very far, and you need to make sure you have room to open the lower door and pull out compost from the front. You also want to be sure to keep the bin at least 6″ away from all fences and structures on all sides. This is so that you don’t get any critters nesting in the nice, dark, warm spaces between the bin and your garage or fence!
Once you have your bin placed, drive a fence post into the ground at each of the four corners. If you have a fence post driver, use that; otherwise a hammer and a scrap block of wood will work!

Drive the stakes about a foot into the ground. Then attach them to the bin itself using 2-1/2″ deck screws through the pre-drilled holes in the fence stakes.
And you’re done! Stand back and enjoy!

I absolutely LOVE this compost bin! It’s really big, which is great, because I plan to do a lot of gardening! The compost that I’m starting now won’t be ready until next year, but that’s ok! At least for now it means I get to recycle our food waste instead of throwing it away, and it’s fun watching the waste slowly decompose into compost!
Does that make me weird? Tell me I’m not the only one out there who celebrates worms and bugs in the yard!
It’s easy to turn the hasp posts with one hand and open up the lid, which I really appreciate. It would be a bummer if I had to use two hands to open the lid every time I took the food waste outside to add it to the pile!
I turn the compost bin about once a week, and it’s decomposing nicely in this bin! Even though the hardware cloth has 1/2″ holes, it’s holding everything in really well, and it definitely allows air to flow through the bin, which is great.
The whole bin is exactly what I wanted, which is why I designed and built it myself in the first place!
Shop this project:


Original article and pictures take http://www.practicallyfunctional.com/how-to-build-a-diy-compost-bin/#_a5y_p=1974965 site
Комментариев нет:
Отправить комментарий